Keurig Leaking From Bottom or Top? 10 Best Fixes To Try Now
It’s likely early when you are reading this. All you want is your morning cup of coffee. You turn on your Keurig and start to brew like you always do. But something is different… Why is my Keurig leaking? You may see your Keurig leaking from bottom or up top by the pod holder. Ugh! How do you fix this? Keep reading to learn about some of the common causes of Keurig leaks and how to fix them.
- Your Keurig Needs To Be Descaled
- Keurig Leaking Coffee
- Water In Keurig Leaking From Top
- Water In Keurig Leaking From Bottom
- More Advanced Keurig Leak Troubleshooting
- Check Your Warranty Coverage / Contact Support
Your Keurig Needs To Be Descaled
The water used to brew your coffee pods leaves minerals behind. These minerals cause limescale to build up inside your Keurig. If left untreated, they can have a negative impact on the water flow of Keurig coffee makers. The limescale will create clogs that can back up water in the coffee machine and result in a leaking Keurig. This buildup can even make a Keurig stop pumping water and affect the taste and temperature of your coffee too.
If you haven’t been descaling regularly, this could very well be causing your Keurig to leak water. Keurig recommends descaling every three to six months, even if you are using a water filter. You should stick to this schedule even if the descale alert light on your brewer has not turned on. If you have hard water, meaning it is high in minerals, you should descale even more often. I would suggest every month or two.
How To Descale A Keurig
You should try running a few descaling cycles to try to remove the buildup that may be clogging your water pipes. You may clear it after one attempt, or you may have to repeat it two or three times. The best way to do this is with a descaling solution. Homemade ones using vinegar just do not work as well. They can also cause leaks by wearing down metal inside your Keurig.
The solutions I recommend are below. Once you have your cleaner, see my related posts for a detailed step by step guide on how to descale every Keurig model.

The safe formula has no odor and acts fast to remove mineral build up with gentle citric acid. Using this solution won’t cause any harm to your brewer. You can buy the solution alone or as part of a bundle with rinse pods and filters that will also help you keep your machine clean. If you have the K-Duo model, be sure to check out this K-Duo bundle.

The Impresa descaler is a top selling descaler. It uses citric and sulfamic acids. Both are gentle on metal and aluminum. A pack has two bottles, each enough for two uses.

Essential Values has a citric acid solution that is both odorless and powerful. Each bottle is good for two uses. A two pack will provide four doses. That’s a year supply if you descale your machine every three months.
Keurig Leaking Coffee
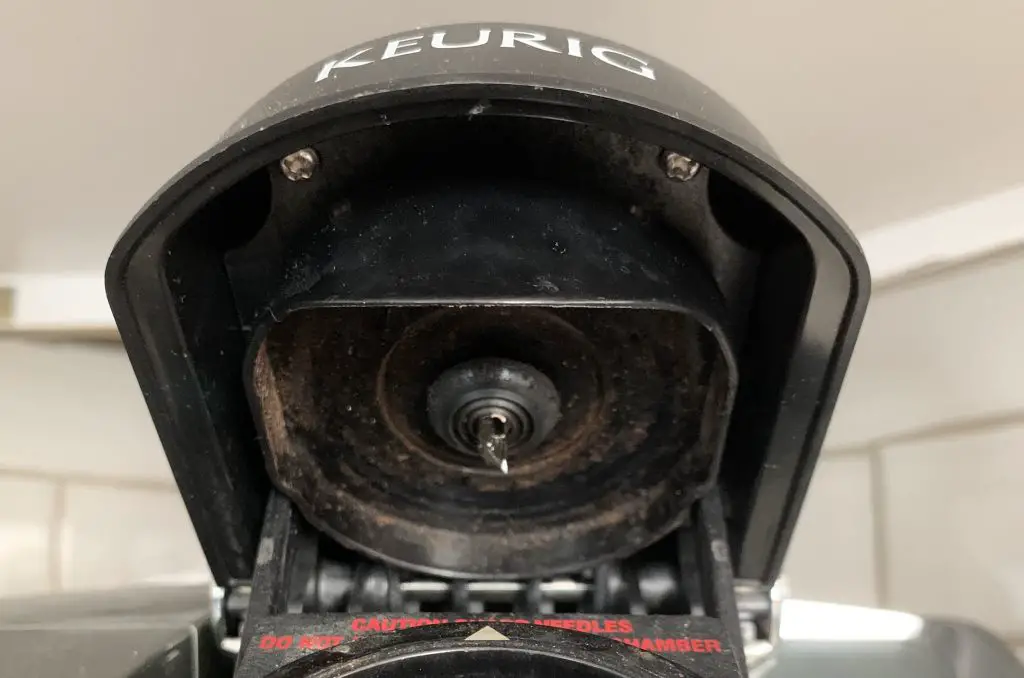
When you brew a K-cup, there are needles inside your coffee maker that make two holes in the pod. There’s one at the top and one on the bottom. The two holes allow hot water to pass through the capsule and eventually make its way to your cup.
However, coffee grounds can get stuck around the needle and eventually become dry and hard. This is especially likely to happen if you leave used K-cups in the pod holder for a long time. As a result, the ground coffee build up around the exit needle can prevent it from properly puncturing the pod. When that happens, instead of exiting the pod and heading for your cup, during a brew cycle the coffee will get backed up in the brewing chamber and start to leak out from the top of the machine.
Dirty Exit Needle
Follow these steps to clean a dirty exit needle. All you need is a paper clip. Use caution because the needles are sharp!
- Straighten one end of a paper clip.
- Turn the machine off and unplug it and remove the water reservoir.
- Grab the sides of the K cup holder and remove it from the brewer by gently pulling away.
- Press the button on both sides to separate the holder from the housing. Push the lever to show the exit needle, then hold it down while flipping the holder over.
- Insert the straight end of the paperclip into the needle area and then move it around in a circle a few times. Rinse the pod holder with water and set it aside to dry.
- Since you have the paper clip, you might as well clean the top needle too. Open the handle and look under to see the top entrance needle. Carefully insert the paper clip and move it around to clean.
- Reinstall the pod holder and close the lid.
Bent Exit Needle
The exit needle should be pointing straight up so that it can pierce the bottom of the K-cup. If you notice that the needle is bent, don’t bother trying to clean it. The needle needs to be replaced. You can find replacement needle gaskets on Amazon. Just be sure to find one that is compatible with your model. These parts are easy to install. Again, the needles are sharp so please use caution!
Water In Keurig Leaking From Top
If you are seeing water leak from the top of your Keurig, there are a few possible reasons:
Overfilling The Water Tank
Never fill your water tank to the very top. When water gets hot it will expand slightly. If this happens and it is full all the way to the top, the pressure build up will cause the water to leak over the edge. So leave some room at the top. If you have a Keurig Mini that doesn’t have a removable water tank, this may be harder to judge. If you follow the steps on how to use your K-Mini, you’ll know that you should use a measuring cup or mug to add water. Never use less then the minimum 6 oz or more than the maximum 12 oz.
Dirty Entrance Needle
If the needle can’t poke the top of the K-cup, water won’t flow into it. Instead, it will drip out of the pod holder area. Follow the same steps provided above to clean the clogged upper needle area.
Defective K-Cups
If you are using third party K-cups and not official ones made from Keurig Green Mountain, they may not be sitting correctly in the pod chamber. Again, if the alignment is off or if the lid is too thick and the needles can’t penetrate the pods, water will leak out. Try using an official K-cup and see if this solves the problem.
Lid Is Not Closing Tightly
When you lower the lid of the Keurig, it should close tightly. This will apply the needed hold on the K-Cup inside. If the lid is at all loose, water pressure will build in the chamber and cause coffee grinds to get pushed into your cup. If this is happening to you, try contacting Keurig support to see if they can help you fix the issue.
Water In Keurig Leaking From Bottom
It’s easy to determine if water is leaking from the base of the unit. Remove and empty the water tank. Then fill it with fresh water and place it upright on top of some paper towels on your counter. Let it sit for a couple hours. When you pick up it, if the paper towel is damp, then one of three issues is causing the leak.
Plastic Water Reservoir Crack
Let’s start with the easy one. Flip the water tank over and look for any visible cracks. They might be large cracks or even hairline cracks. If you see any, you need to replace the tank. You can call Keurig to ask about buying a new one. You can also try to find a water tank compatible with your brewer model on Amazon.
Worn Water Reservoir Seal
At the bottom of the water tank, there is a little valve. When you securely attach the tank to the machine, water is supposed to exit from the valve into the brewer’s pump. Unfortunately, limescale buildup can interfere with this connection. If that happens and a good seal is not made, water will leak out. First take a little bit of white vinegar and try to clean both the valve and the connection on the base. Wipe it down and let it dry. Put the tank back on and see if the connection has improved and prevented a leak. If not, you can try applying a tiny bit of silicon faucet grease to both parts.
Defective O-Ring
It is also possible that the O-ring that is meant to secure the connection between the valve and the pump is defective or worn out. In that case, replacing the O-ring may be required instead of applying the silicon grease. You can see how to do this on this popular YouTube video.
More Advanced Keurig Leak Troubleshooting
If you have ruled out the above causes of your Keurig leaking, the issue is likely with one or more broken internal pieces. These can include the upper gasket, tube connectors, filters, water line circuit, heating element or internal pipes. Diagnosing and replacing these parts is very advanced. You would need to open up your coffee maker. This can void your warranty. You may find video tutorials online, but I suggest you do NOT attempt to do this. Instead, contact Keurig support and find out what your options are to get help with a repair.
Check Your Warranty Coverage / Contact Support
If you bought your machine new from Keurig or one of its retail partners, it has a warranty. For many models it is a one year warranty. If you already registered your Keurig, then getting support under the warranty will be easy. Just call support. If you haven’t done this, you’ll need to dig up your receipt and find your serial number. Then contact customer service to register. If it is under warranty, support should be help you. They may ask you to send the machine in for repair. They may also just send you a replacement machine.