How To Use A Keurig Single Serve Coffee Maker

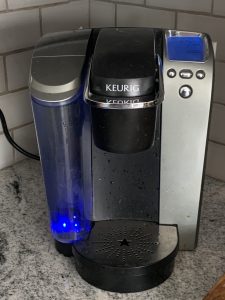
Learning how to use a Keurig is easy. After all, the convenience factor was probably one of the main reasons you sprung for a pod machine instead of a drip coffee maker. Keep reading to learn everything you need to know about how to work and operate a Keurig, including set up, brewing, cleaning and recycling.
If you happen to have a K-Mini model, see my related post for more specific instructions.
Setting Up Your Keurig Machine
Unboxing
Carefully remove your machine from the box. Remove any packing tape that there may be on any of the coffee maker pieces. Wipe down an area of your counter where you want to store it, near a working power outlet. Plug it in.
Prepare The Water Tank
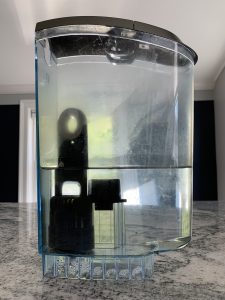
If your model has a removable tank, you’ll want to take it off to clean it first. Take the lid off of the water tank, then lift the reservoir straight up to remove it. Bring it over to your sink and give it a thorough cleaning with soap and warm water. Only clean it with a soft sponge, nothing abrasive.
If your model came with a water filter starter kit, you’ll need to prep that too. Take the charcoal water filter cartridge and soak it in clean water for 5 minutes. When done, rinse it for 60 seconds under cold water. Grab the plastic water filter holder. Locate the two tabs on both sides of the base. Push them in at the same time and pull down to open up the area where you need to insert the filter. Place it in and then reattach the bottom of the filter holder. Put the filter holder into the empty, clean water tank. Push firmly down to attach it the filter to the tank.
Fill the water reservoir with fresh water up the MAX line. Replace the lid. Place the tank on the machine, making sure it connects securely.

What Type of Water To Put In Keurigs
Only put tap, bottled or filtered water in your brewer. Keurig specifically says that you should NOT use distilled water. Distilled water lacks minerals. As a result, it attracts metal ions from the components inside. This can cause them to break down over time. You also need some minerals in your water for your coffee to taste good.
A Warning About Milk
Since we are talking about the water tank, a warning: you should never put milk in there! It can seriously damage your machine beyond repair. If you need to heat milk for hot chocolate or a latte, do so on the stovetop or with a steam wand.
Power On The Brewer
Locate the power button on your machine. On most Keurigs it will be somewhere in the top right. Once you press it, lights should turn on and the brewer will start warming up. It will take a few minutes for the water to heat to 192 degrees Fahrenheit. This could take as little as 20 seconds to as long as three or four minutes, depending on what model you have. Some models will have a light that will flash next to the word HEATING to let you know what is going on. When that light turns off, it is ready to brew. If your model does not have the HEATING light, just wait for the sounds to stop.
Run A Cleansing Brew
Not so fast with that K-cup! Before you make your first coffee, you should run water through the machine to remove anything that may have ended in there during manufacturing or storage. It’s easy. Open and close the lid. Don’t put a K-cup inside. If your machine has a placeholder disc in the pod holder, remove that and set it aside. Place a mug under the coffee outlet and then press any button size. Hot water will start to dispense. When the cleansing brew is done, just discard the water and rinse out your mug.
How To Use Your Keurig Coffee Maker To Brew A K-Cup
Choosing A K-Cup
There are hundreds of K-cups to choose one. Try a bunch and you’ll be sure to find your new favorite coffees. There is a range of roasts and caffeine levels. There are even some pods that are crafted for iced coffees. In addition to coffee, you can even find hot chocolate and tea K-cups too. If you already have a favorite coffee, you can brew your own grinds too with the My K-Cup reusable pod.
A notable exception to the assortment is espresso. Keurig machines don’t have the high pressure power needed to brew authentic espresso. For that you would need a Nespresso. If you want to try to make a latte with a Keurig, your best bet will be espresso roast pods that try to mimic the flavor of espresso.
If you bought a Keurig 2.0 model, know that not all K-cups are compatible with your machine. You can only use pods made directly by Keurig, not third party manufacturers. Just look for “Keurig Brewed” on the pod lid.
Brewing A Pod
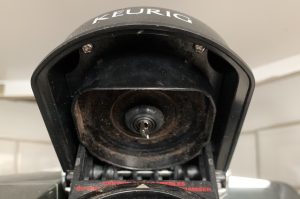
Place a mug under the coffee outlet. Lift the handle on the front of the machine to open the brewing chamber. Place a single K-cup in the pod holder, with the lid facing up. Do not remove the pod’s foil lid! There are needles below the pod holder and underneath the brewing chamber lid that will pierce the K-cup once you lower the handle to close the lid. These holes allow the hot water to flow through. If you live in a high altitude area, you may need to pre-puncture your pods. Just push the K-cup down once you place it in the pod holder.
Some models will start to brew as soon as you lower the lid. However, for most you’ll have to press a button. The button will say BREW. If you have a 2.0 model with a touch screen display, hit the brew button on the screen. To stop the process at any time, just press and hold the power button.
If you need to make multiple cups of coffee, you may need to wait a few seconds for the machine to reheat in between brews. Otherwise, soon after brewing, you should open the lid and carefully remove the pod (it may be hot). Leave the brewer’s lid open for a little while for the brewing chamber to dry out. Most models have an auto-off function to save energy.
If you have a My K-Cup reusable filter, you can see my related post on how to brew using your own coffee grinds.
Understanding Some Settings & Options
Some Keurig models will have some settings that you can adjust before you hit the BREW button. If you ever adjust a setting and then later change your mind about it, you can always reset your machine to get back to factory settings.
Cup Size
Most machines will have an option to brew at least three different cup sizes. Common ones are a 6 oz cup, an 8 oz mug or a 10 oz mug. Some newer models like the K-Supreme Plus even can go even smaller and larger, with a 4 oz cup or a 12 oz mug. A few even have a SHOT button that makes a 2 oz concentrated pour.
The Strong Button
Some Keurig coffee makers, like the K-Elite, will have a button labeled STRONG. Pushing that at the start of your brew will increase the strength and bold taste of your coffee.
Temperature
Keurig 2.0, Plus and K-Supreme models have an option to adjust the default coffee temperature. You can choose to have the pods brew cooler than normal, or even hotter.
Brew Over Ice Button
Some of the newer machines can make an iced coffee with the push of a button. Just fill a cup with ice (don’t use glass), insert a pod and push the brew over ice button. It will brew at a lower temperature and make the coffee extra strong because some ice will melt and water it down.
High Altitude
Keurig 2.0 and Plus models will have a high altitude button. This will lower the temperature for optimal brewing in your location.
Hot Cocoa
If you are making hot chocolate with a Keurig 2.0 or Plus, select the HOT COCOA button before pressing BREW.
Can You Use A Keurig Pod Twice?
Don’t run a Keurig pod twice. I know it may be a tempting way to try to save some money. However, if you do it your coffee will likely taste bad. That’s because the coffee grounds inside the K-Cup will be over-extracted the second time around. If you are looking to cut costs, you may want to try using your own coffee grinds in a reusable filter or checking out some pods from sites like Gourmesso.
How To Care For Your Keurig Coffee Maker
Learning how to properly maintain your Keurig is important if you want it to last for a long time.
Basic Cleaning
I strongly suggest seeing my related post for a full guide on how to clean a Keurig, including basic daily, weekly, monthly, bi-monthly and semi-annually cleaning steps. The following two things are some of the most important basic cleaning steps you can take.
Always eject used K-cups right after brewing. Never leave them in the holder. If you do, coffee grinds can get stuck there leading to a burnt or bitter taste in your next cup. Then, when you are done using it for the day, run a fresh water only brew cycle with no K-cup in the unit. This will rinse out any grinds that may have been left behind.
Run a Keurig rinse pod to remove any coffee residue or oils from inside the machine every week. If not, residue and oil can build up in your brewer over time. A rinse pod is the easiest way to clean your K-cup pod holder. These pods contain a special formula that can rinse away the leftover coffee residue and oils.
If you have a 2.0 model, you should also regularly wipe down the touch screen with a soft damp cloth. This will prevent dust from building up. If left there, your touch screen could stop working.
Keep the Water Filter Fresh
Most Keurig brewers have a charcoal water filter. The filter helps remove mineral deposits and other impurities from the water used to brew your K-cups. You should replace the filter every 2 months or every after using 60 full water tanks. Try to keep track of how many times the reservoir is empty. Learn how to replace a Keurig water filter.
Needle Maintenance

When you brew a K-cup, there are needles inside your coffee maker that make holes at the top and bottom of the pod. This allows hot water to pass through the capsule and make its way to your cup. The ground coffee in the pods can get stuck around the needle. If left there, they will turn dry and hard. This is more likely to happen if you don’t discard your pods soon after brewing. Eventually you may end up with Keurig coffee grounds in your cup. This may also make it harder for your Keurig’s needles to puncture the K-Cup pods. If you have a 2.0 model, you may also get a water under pressure error that will prevent you from using the brewer. Check out my related post to learn how to clean the Keurig needles.
Descaling
The water used to brew your K-cups has minerals that cause limescale to build up inside your coffee maker. These are not toxic, but they can affect your Keurig’s water flow as well as the taste and temperature of your coffee. Regularly descaling your brewer will keep it in top shape. You should do this every 3 to 6 months, even if you are using filtered water. Some models will have a descale alert that will light up when the coffee maker senses blockages. See my related post on how to descale a Keurig.
Storage or Long Period of Non-Use
If there is ever going to be a time when you won’t be using your Keurig for a while, say a week or two or longer, you should try to empty the internal water tank. This will prevent mold or limescale from building up inside while the brewer is not being used. If you are leaving it in a cold climate, it will also keep it from freezing.
Recycling Your K-Cups
Since the end of 2020, all K-cups are recyclable. They are made of a plastic that is accepted in curbside recycling programs across most of North America. Just peel back the lid, empty the coffee grinds in the trash or compost, and then place the plastic pod in the recycling bin. It’s a simple thing you can do to reduce the environmental impact of using a Keurig coffee maker.


I liked that post mentioned that the internal water tank must be empty to stop mold or limescale from building up. My husband is a coffee lover and so he wants to buy a Keurig maker. He should look for an authorized distributor, and we will refer to the post for how-tos.